
Song Master provides simple looping and more advanced features to help you progressively learn a small segment of a song.
Selecting the Region to Loop
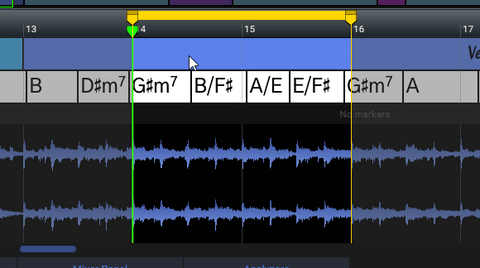
There are many ways to define a loop region. One way is to click and drag in the top part of the Bar track.

When a loop region has been selected, a yellow bar is displayed and regions outside of the yellow bar are dimmed to indicate that they will not be played.
You can also create a loop region by holding <shift> and then click and drag in the Waveform view.
A one-handed way to define a loop region is to click and drag in the bottom 1/4 of the Waveform view (clicking in the top 3/4 re-positions the play-head).

Editing a Loop Region
To move a loop region, click the yellow bar and drag it to the desired time.

Adjust the Start and End points by clicking and dragging the end-point markers. Below we change the loop's starting time.
Below we change the loop end point.

Note that the current Snap To setting is used when manipulating the loop region. Refer to the Snap To article for details.

Tip: If you click and drag a loop marker in the Waveform view when the Snap To setting is Auto then snapping is turned off. This is useful if you need to finely adjust the start or end points.
Adding Silent Time at Beginning and/or Ending of Loop
Song Master allows for loop regions to begin and/or end with a period of silence. This feature is useful, for instance, if you are learning the initial "pick-up" part of the phrase and you want the loop to start on beat 1 but you don't want to hear the song until it gets to the start of the phrase. This feature is also useful if you'd like to have some time to hear yourself play the phrase without the song. For example, say you are transcribing or learning to play a two-bar phrase. You'd set the loop region around the two bars of interest, and then extend it to play silence for the two bars following the phrase.
To extend a loop region to include a silent section, click and drag the top rectangle of a loop marker. In the example above, we want the loop to include one bar of silence before playing two bars of the looped section.

Quickly Defining Loop Regions
Loop regions can easily be defined using the keyboard. The main looping keys are configured in three rows of three keys each (for old time gamers, this is the Quake/WASD keys).

Pressing the key in the middle of each row (w, s, x) will define a loop region for that row's marker type. For example, pressing w will define a loop for the current Section, pressing x will create a loop region for the current Bar, and pressing s will define a loop region that encompasses the current and next Note markers.
In the following clip, we press w to select the current Section, then we press s to define a loop between two Note markers. Finally, we press x to create a loop region based on the current bar.

The middle keys of each row (w, s, x) will act as a toggle between defining the loop and disabling the loop. So if a loop is already defined, pressing the middle-key of any row will disable looping, press the same key again, and it will define a new loop region.
Extending Loop Regions
Besides clicking and dragging the loop start and end markers with the mouse, you can also use the keyboard. To extend a loop region to the left or right, hold down shift while pressing the first or third key, respectively, in each row-group. To reduce the loop size (move the start and end markers inward), follow a similar procedure but hold down shift+ctrl plus the first or third key of each row-group.
To illustrate, in the clip below we press x to create a one bar loop region, then we press Shift-C to extend the loop to the right by one bar, then we press Shift-A to extend the loop start to the left, to end up with a three bar loop region.

Loop Control
The Loop Control panel (on the Tools tab) has controls to adjust the selected loop region and to change the looping behavior.
By default, a loop will repeat infinitely. You can instead have it repeat a specific set of times by entering a number in the Num times field at the top of the Loop Control panel. The Clear button is a quick way to reset this value back to 0 so it will loop infinitely.
At End tab
When you specify a non-zero number for Num times, you can specify an action to occur once the loop has been played for the designated number of times. You specify what this action is on the At end:
The At end can be to stop, move the loop a specified number of beats, move the loop a specified percent of the loop duration (i.e if loop is 8 bars long, 50% would move the loop 4 bars), move the loop to the next Note marker, and move the loop to the next Section. Any value other than stop will restart the loop at the new location.
The Adjust tab
The Adjust tab has a number of buttons that can be used to adjust the start and end of a loop by a bar or a tiny amount ("nudge").

The two buttons on the move bar row will move the entire loop to the previous or next bar.
The two buttons on the move At end row will move the loop according to the current value set on the At end tab. For example, if At end is set to to next Section then these buttons will move and set the loop previous or next section.
.